Time for the chapter on writing our first functional test of the book, as always you can read the chapter of the book here, as well as the full book.
Here’s also a list of chapters you can find as blog posts on the site:
- Book Introduction
- Getting started
- Writing our first functional test
- Continuous delivery
- Building Your Assets Using Grunt
- Development guided by tests
_TODO: What is a functional test?
I order to write our first functional test we needed a test page, which we built in the previous section. Now let’s set up a simple Node.js webserver. Throughout this section and in future you may find me refering to these kind of tests as Functional Tests, End-to-end, Feature tests or indeed User Journey tests. Confusing I know, I will try my best to keep it to feature and end-to-end tests, but be prepared when discussing this topic to come across the same variety of breadth of names for Functional tests.
Web server: Express
A good practice to follow while working with Git is to create a branch for each feature that you are working on, so let’s go ahead and create a new branch for this item of work.
git checkout -b web-server
Make sure you are in the root of our project and not in the app/ folder
Since we’ll be using Node.js we can use NPM to manage the dependencies. These dependencies are stored in a folder called node_modules. Since we don’t want to check any node modules/packages into our repository we added that folder to our .gitignore file in when we set up the project. If we don’t add those packages to our repository you may be wondering how our CI and Heroku instance will now how to run the app. To that end we’ll use a handy file called package.json. When we run NPM we can not only install dependencies, we can also add them to our package.json file and our target envinronments can read this file and install these packages for us.
Typing npm init give us a way to create our package.json, here’s what I answered when prompted:
This utility will walk you through creating a package.json file. It only covers the most common items, and tries to guess sane defaults.
See npm help json for definitive documentation on these fields
and exactly what they do.
Use npm install <pkg> --save afterwards to install a package and
save it as a dependency in the package.json file.
Press ^C at any time to quit.
name: (weatherly)
version: (0.0.0)
description: Building a web app guided by tests
entry point: (index.js)
test command: grunt test
git repository: (https://github.com/gregstewart/weatherly.git)
keywords:
author: Greg Stewart
license: (ISC) MIT
About to write to /Users/gregstewart/Projects/github/weatherly/package.json:

{
    "name": "weatherly",
    "version": "0.0.0",
    "description": "Building a web app guided by tests",
    "main": "index.js",
    "scripts": {
        "test": "grunt test"
    },
    "repository": {
        "type": "git",
        "url": "https://github.com/gregstewart/weatherly.git"
    },
    "author": "Greg Stewart",
    "license": "MIT",
    "bugs": {
        "url": "https://github.com/gregstewart/weatherly/issues"
    },
    "homepage": "https://github.com/gregstewart/weatherly"
}

Is this ok? (yes) yes
As you can see it autocompleted a bunch of information for you, such as the project name, version number and Git details. Let’s add that file to our repo before going any further:
git add package.json
git commit -m "Created package.json file"
Now let’s go ahead and install a web server module. We’ll just use express.
npm install express --save
By specifying --save the dependecy was added to our package.json file, if you open it up you should see the following toward the end of the file:
"dependencies": {
        "express": "^4.4.5"
}
Next create a new file called server.js in the root of our project and add the following content:
var express = require('express');
var app = express();

app.use(express.static(__dirname + '/app'));

var server = app.listen(3000, function() {
  console.log('Listening on port %d', server.address().port);
});
And to start our server type:
npm start
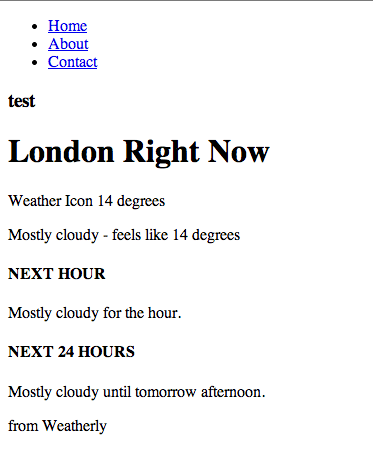
If you now open your browser and hit http://localhost:3000 you should once again see:
The process that runs our server is not daemonised and will continue to run until we close the console or type ^C. Go ahead and kill the server and add those changes to our repository, merge these changes back into master and finally push to origin:
git add server.js
git add package.json
git commit -m "Installed Connect and created a very basic web server for our app"
git checkout master
git merge web-server
git push
Cucumber, WebDriver and Selenium
For our functional tests I have chosen Cucumber.js and WebDriver.js with Selenium. I chose this combination because I believe this will give you greater felxibility in the long wrong, especially if you plan on using different languagesin your toolchain. You can find Ruby, Java and .Net versions of Cucumber, WebDriver and Selenium.
Once again we’ll create a dedicated branch for this work:
git checkout -b functional-test
Selenium
Selenium uses Java, so you will need to make sure you have it installed.
We could install the binaries manually, but since I plan using Grunt to automate tasks around starting and stopping the server, we might as well use [grunt-selenium-webdriver] (https://www.npmjs.org/package/grunt-selenium-webdriver) module as this includes everything that we need, including the jar file for the Selenium Server.
npm install grunt-selenium-webdriver --save-dev
We use the --save-dev flag to indicate that we want to add this dependency to our package.json file, however only for development purposes. With that done let’s create a Grunt task to start the server (you can find more information on Grunt and tasks over at the official Grunt.js website). The first thing we’ll need is a Gruntfile.js, so add one to the root of your project and edit it to contain the following:
module.exports = function(grunt) {
    grunt.initConfig({
    });

    grunt.loadNpmTasks('grunt-selenium-webdriver');

    grunt.registerTask('e2e', [
        'selenium_start',
        'selenium_stop'
    ]);
};
Save the changes and at the command line type: grunt e2e and you should see something like this:
Running "selenium_start" task
seleniumrc webdriver ready on 127.0.0.1:4444

Running "selenium_stop" task

Done, without errors.
This told grunt to execite a task called e2e and confirms that the selenium server started properly at the following address 127.0.0.1:4444 and then was shutdown again (apparently it is not necessary to shutdown the server with a stop task).
Using Grunt to start and stop the server
Let’s also add a step to stop and start our web server when we are running our frunctional tests. To that end we’ll install another grunt module:
npm install grunt-express-server --save-dev
And we’ll edit our Grunt file so that it looks for our server.js and we can control the starting and stopping of our server:
module.exports = function(grunt) {
    grunt.initConfig({
        express: {
            test: {
                options: {
                    script: './server.js'
                }
            }
        }
    });

    grunt.loadNpmTasks('grunt-express-server');
    grunt.loadNpmTasks('grunt-selenium-webdriver');

    grunt.registerTask('e2e', [
        'selenium_start',
        'express:test',
        'selenium_stop',
        'express:test:stop'
    ]);
};
If you now run grunt e2e, you should see the following output:
Running "selenium_start" task
seleniumrc webdriver ready on 127.0.0.1:4444

Running "express:test" (express) task
Starting background Express server
Listening on port 3000

Running "selenium_stop" task

Running "express:test:stop" (express) task
WebDriver
The next thing we need to do is install WebDriver.js and we are then nearly ready to write our first feature test:
npm install webdriverjs --save-dev
Cucumber
The final piece of the puzzle is Cucumber.js:
npm install cucumber --save-dev
Our first test
Features are written using the Gherkin syntax, and this is what our first feature looks like:
Feature: Using our awesome weather app
    As a user of weatherly
    I should be able to see the weather information for my location

    Scenario: Viewing the homepage
        Given I am on the home page
        When I view the main content area
        Then I should see the temperature for my location
I like to store these and the associated code in a e2e directory under a parent tests folder. So go ahead and create that folder structure under the root of our project. Then create a features folder and save the above feature contents to a file called using-weatherly.feature.
If we were to run our cucumber tests now using cucumber.js tests/e2e/features/using-weatherly.feature we would see the following output:
UUU

1 scenario (1 undefined)
3 steps (3 undefined)
You can implement step definitions for undefined steps with these snippets:
this.Given(/^I am on the home page$/, function (callback) {
    // express the regexp above with the code you wish you had
    callback.pending();
});

this.When(/^I view the main content area$/, function (callback) {
    // express the regexp above with the code you wish you had
    callback.pending();
});

this.Then(/^I should see the temperature for my location$/, function (callback) {
    // express the regexp above with the code you wish you had
    callback.pending();
});
This is extremely useful output. While it’s clear that the code to execute the steps in the feature are undefined, the output actually gives snippets to create our step definitions. So let’s go ahead and create our step definition. Inside of our functional test folder, create a steps folder and add a file called using-weather-steps.js with the following content:
var UsingWeatherlyStepDefinitions = function () {

    this.Given(/^I am on the home page$/, function (callback) {
        // express the regexp above with the code you wish you had
        callback.pending();
    });

    this.When(/^I view the main content area$/, function (callback) {
        // express the regexp above with the code you wish you had
        callback.pending();
    });

    this.Then(/^I should see the temperature for my location$/, function (callback) {
        // express the regexp above with the code you wish you had
        callback.pending();
    });
};

module.exports = UsingWeatherlyStepDefinitions;
Let’s try and execute our feature test again with cucumber.js tests/e2e/features/using-weatherly.feature --require tests/e2e/steps/using-weatherly-step-definitions.js and now we should see:
P--

1 scenario (1 pending)
3 steps (1 pending, 2 skipped)
Time to flesh out the steps to do some work and check for elements on the page while the tests are running. We’ll make use of Chai.js as our assertion library, so let’s go ahead and install this module:
npm install chai --save-dev
The first bit of code we’ll add to our tests is a World object, which willl initialise our browser (read WebDriver) and add a few helper methods (visit and hasText). As our browser we are using phantomjs, but if you would like to see the test running simply replace browserName: 'phantomjs' with say browserName: 'firefox'.
Note that other browsers such as Chrome and IE require special drivers which you can download from the Selenium website
Here’s our world object (world.js), which we save into a folder called support under tests/e2e:
var webdriverjs = require('webdriverjs');
var expect = require('chai').expect;
var assert = require('chai').assert;

var client = webdriverjs.remote({ desiredCapabilities: {browserName: 'phantomjs'}, logLevel: 'silent' });

client.addCommand('hasText', function (selector, text, callback) {
    this.getText(selector, function (error, result) {
        expect(result).to.have.string(text);
        callback();
    });
});

client.init();


var World = function World(callback) {
    this.browser = client;

    this.visit = function(url, callback) {
        this.browser.url(url, callback);
    };

    callback(); // tell Cucumber we're finished and to use 'this' as the world instance
};

exports.World = World;
Please note that if when running the tests you come across the message shown below (logging in verbose mode here), this simply (indeed simply…) means that webdriverjs cannot find phatomjs in your PATH.
====================================================================================
Selenium 2.0/webdriver protocol bindings implementation with helper commands in nodejs.
For a complete list of commands, visit http://webdriver.io/docs.html.

====================================================================================

[09:51:45]:  ERROR      Couldn't get a session ID - undefined
Fatal error: [init()] <=
An unknown server-side error occurred while processing the command.
Now let’s re-visit our using-weatherly-step-definitions.js and replace the contents with the following code:
var UsingWeatherlyStepDefinitions = function () {
    this.World = require("../support/world.js").World;

    this.Given(/^I am on the home page$/, function (callback) {
        this.visit('http://localhost:3000/', callback);
    });

    this.When(/^I view the main content area$/, function (callback) {
        this.browser.hasText('.jumbotron h1', 'London Right Now', callback);
    });

    this.Then(/^I should see the temperature for my location$/, function (callback) {
        this.browser.hasText('p.temperature', '14 degrees', callback);
    });
};

module.exports = UsingWeatherlyStepDefinitions;
The first step opens the site, and then we assert that the header element displays London Right Now and that the element with our temperature shows 14 degrees
If we were to once again try and execute our feature test, we would get an error telling us that it can’t connect to the selenium server. So let’s wrap all of this into our e2e grunt task. Let’s start by adding another module to our setup:
npm install grunt-cucumber --save-dev
And let’s edit our Gruntfile.js to look like this now:
module.exports = function(grunt) {
    grunt.initConfig({
        express: {
            test: {
                options: {
                    script: './server.js'
                }
            }
        },
        cucumberjs: {
            src: 'tests/e2e/features/',
            options: {
                steps: 'tests/e2e/steps/'
            }
        }
    });

    grunt.loadNpmTasks('grunt-express-server');
    grunt.loadNpmTasks('grunt-selenium-webdriver');
    grunt.loadNpmTasks('grunt-cucumber');

    grunt.registerTask('e2e', [
        'selenium_start',
        'express:test',
        'cucumberjs',
        'selenium_stop',
        'express:test:stop'
    ]);
};
Now type grunt e2e and you should see the following output:
Running "selenium_start" task
seleniumrc webdriver ready on 127.0.0.1:4444

Running "express:test" (express) task
Starting background Express server
Listening on port 3000

Running "cucumberjs:src" (cucumberjs) task
...

1 scenario (1 passed)
3 steps (3 passed)

Running "selenium_stop" task

Running "express:test:stop" (express) task
Stopping Express server

Done, without errors.
With that done we can commit our changes to our repository:
git add .
git commit -m "Scenario: Viewing the homepage, created and implemented"
git checkout master
git merge functional-test
git push
Recap
To sum things up in this section we created a set of grunt tasks that:
- start our selenium server
- start our express server that hosts our page
- execute the features and steps we defined with cucumberjs
- output the result to the console
- closes down the services after finishing the tests
We also wrote a feature test that:
- open a browser
- check the contents for a header
- check for an element that holds the current temperature
You can read the full book over at GitBook or LeanPub. Updated content for this chapter can be found on GitHub.